Showing posts with label nice stuff. Show all posts

Sunday, 21 March 2010

Treasure


One of my friends was having a clear out - beads, sequins, charms and lots of paints - perfect for the up coming summer holidays (hush!) and some dressing up clothes.... 3 boxes of loot.... now to find a place for all of it! a little bit like Christmas.....

Tuesday, 9 March 2010

Great big pile of fluff


I've been working on another skirt, this one white.... like the pink one.... but a little longer - I gathered together some of the pink 'offcuts' and made a hair thingie, only problem is finding a suitable - and small - clip for the back, it's just 3 inches across so I need the little people size.... more hunting....

Sunday, 28 February 2010

Miss E's party


We went to Miss E's party today - she's one of T1's class mates for Turkish, and in the same English speakers group as T1 and T2. She loaned her grandmothers large house overlooking the Bosphorus and had a magician. T1 can not stop telling everyone about the magic.... I enjoyed having valet parking at a birthday party.... T2 produced this card for her - Alex the Lion from Madagascar and Buck from Ice Age.... with bunting (it is a party after all!) Greetings cards are not readily available here, we make lots of cards.....

Saturday, 27 February 2010

Boyner bottle light fitting


This lamp isn't for sale but display only at Boyner in Istinye Park - very neat - clear light bulbs and the bottom of the bottles sawn off.... very clever and hard to discreetly photograph.....

Friday, 19 February 2010

Sticks of oya


I have long wondered the best way to 'display' my oya 'collection' one museum has window picture frames with a standard length displayed. This was a seller in Ortakoy - very neat idea.... it may get stolen....

Tuesday, 16 February 2010

Ruffling for 5000 years


OK a slight exaggeration, but it feels like it, the first attempt at the skirt failed miserably, the thing just was so ruffled it would have been unwearable.... I'm having worries about this one now being the same, even though it's 'half' as ruffled.... thank goodness I have the ruffler foot that is now making 'give me a break for 10 minutes' kind of noises - maybe it needs oiling?.... and that the net is beautiful and soft and does not tear when you frog stitch. So skirt mark II - half way through...... they better like them....

Sunday, 14 February 2010

Spoons


These were in the same cafe as the Nargile.... neat eh?
My boy sent me a Valentine - only someone has hidden it.... will have a big hunt tomorrow....it's cute.... but then again he is cute.. 5.5 years old with 2 missing teeth...

Friday, 12 February 2010

More from the market


No 3 loved these grips, a simple soldered cluster of crystals on a old fashioned hair grip.... super cute.

Tuesday, 9 February 2010

More fluff


It looks like it will be a nice skirt, though less than half done, it's taken 3 times the amount of time, and 4 times the amount of fabric.... thank goodness I got a ruffler foot for my Nina a long time ago - worth it's weight in gold.... almost! lets hope the skirt looks great - or else lots of frog stitching... and of course, a second one to make!

Monday, 8 February 2010

Fluff and stuff...


To try and head off dressing up wars, I had a trip to my favourite supplier of all things fluffy and frivolous for net.... these are for garments, the swirls are cream net, delicious and soft, the 'rock' fabric is hand beaded, and layers of 'transfer printed' net, but again, surpisingly not at all stiff. 10 meters of super soft, pink net has been porcured for a new fluffy skirt... or two

Sunday, 22 November 2009

Fringe making


First I cut a piece of card, with an opening, wide enough for the presser foot...
then I cut a second identically sized piece of card, holding the cards together I wound the cord onto the two, until it reached the desired size.

I gingerly slid the uncut piece of card out and laid the card with the window onto the base fabric. I sewed through the window - just a simple straight stitch, up and down a couple of times. I then tore the card to release it - ta-da! Super thick fringe....

In the future I would be tempted to sew onto a ribbon then placement wouldn't be an issue - easy! (I trimmed off the stray tails after sewing it all down!)

Friday, 20 November 2009

24 November - Teachers' day - part 2

These were T1's cards, 3 to her English teachers, and one to her home room teacher, all made a similar way - a petal and then another flower cut to make the skirt - very clever..... lots of writing - She is into letters at the moment big time.....

Miss M - another English teacher - 'Happy teachers' day, my special dostum! I like you because you have long, long, long, long hair'

Miss Happy - the regular English teacher - ' Happy teachers' day, I like you because one day you painted my face and it tickled'

Miss I - home room teacher - 'Happy teachers' day, I like you because you always smile in the morning when you see me, you sing nice songs and help me. You give me nice hugs too'

Miss R - T1's English teacher whilst Miss Happy has been sick. 'Happy teachers' day, I love your class and you have very nice brown hair'
I broke out the gel pens, whilst they are a little messy - the effects are great! a lot better than felt-tips...... that's all for this year..... * dostum means friend/pal

Thursday, 19 November 2009

24 November - Teachers' day

As Ataturk said 'New generation will be created by teachers'. Since next week is bayram, then our school has brought the day forward to tomorrow. Cookies were suggested, being short of cookie making time this evening we opted for chocolates, and home made cards. I asked the littles what they liked best about their teachers, and which teachers they liked best, they had no choice with their home-room teacher or English teacher, T2 chose the classroom assistant - T1's tomorrow.

Miss Happy (yes it's her real name!) - 'Happy Birthday (he says it was yesterday?) and happy teachers' day - I love to play with you'

For the classroom assistant - Miss S 'Happy teachers day because you are nice'

For Miss C - the home room teacher, 'Happy teachers' day because I like it when you tell stories'

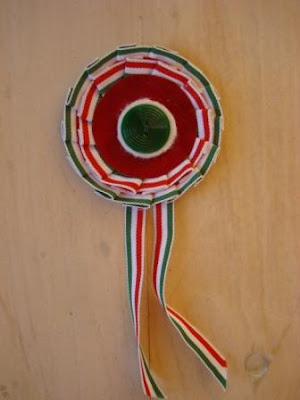
Rosette Making


I cut a circle out of card, then with a compass drew a line about ¼ if an inch from the edge. I set my machine to a zig-zag, then attached the ribbon, making pleats as I went. I have miles of this Genuine Hungarian ribbon (not sure why though!)

I lined up the 2nd row of ribbon with the stripes of the first, but there is no reason you couldn't line another row up with a drawn circle. I attached the 'tails' with this layer.


I cut a circle of paper, a circle of felt and a button. With a Glue stick I assembled them and sewed the button on to secure them all. The threads from sewing the button were left on so that I could attach the rosette. Easy - we should all be decorated!

Monday, 16 November 2009

Follow me blindly - day 5


'take your fabulously embellished piece and trim off the excess backing fabric, for those who haven't done this already. now - fuse or glue a final back fabric - to cover up all those embellished threads... then stitch all the way around your piece, to bind it.you will now "sculpt" your piece into a vessel of some sort - a fiber art vase. ;) think out of the BOX!! be creative! roll, wrap over, fold, tuck, pucker... even cut if you want... and sew it into place. the most unusual shapes will lend themselves to a unique form/structure. ;) if you want to add any final embellishments to your sculpture, you can do this once it's complete.'

So today was the last day of the challenge, I was 12 hours late on completing this one I guess, I wracked my brain about turning it into a vessel, I don't need any 'clutter' I am on a slight purge to get the house straight - and the idea of something that catches dust turns me straight off. I do need a folder type thing to keep projects in, but the surface wouldn't stand up to that, I also need a 'change dump' to empty my pockets and keep all the debris in one place, I made simple folds and stitched them down, the felt base has given it a certain substance, the slightly circular shape holds with the design. I may go round and zig-zag a piece of wire into the top edge. I may not. I will probably work on it some more and turn it into something else, It's got a nice motion happening, just not enough of something.....

Sunday, 15 November 2009

Follow me blindly - day 4


So today's mission.....

EMBELLISH YOUR PIECE! use hand-stitching, beads, etc... ;)

Due to a total lack of time, the piece just got a few beads.... no stitching, sadly. I may come back and add to it once the challenge is over...

Saturday, 14 November 2009

Follow me blindly - day 3


Today's step was
'Take a pair of scissors and carefully CUT UP YOUR PIECE! ;) yes, you read it right. cut it up. you must cut into it AT LEAST 5 times! ;) you can cut strips, circles, puzzle shapes... whatever you want to do... but keep in mind that you are going to be sewing it back together into a NEW shape!...'
So I started with about 5 cuts, then a few more, but wasn't happy because it wouldn't go together without becoming 24 inches square - somehow, so I did this, well there are a few bits left over, but that will have to be..... I FME'd it to black felt with red thread.

Friday, 13 November 2009

Follow me blindly - day 2


Day Two:.... layer your cloth onto a piece of batting, felt, or similar and machine stitch all over with contrasting or complimentary threads. (optional - layer some organza on top first, then machine stitch all over 3 layers with rayon thread... then using your burning tool, melt away the spaces of organza between the stitches.)

I put some net over, since I didn't have a suitably coloured organza, nor a burning tool..... I don't like it, it looks too stiff...... but it's not the end, lets see what happens.....

Thursday, 12 November 2009

Follow me blindly - day 1


I take part in some of the FAT stuff, I like the group there is a real cross over between crafters and artists, it's a good environment for me. Leilani set the 5X challenge a while ago, I enjoyed the way it made me think and the kick up the backside to get making stuff..... this is her latest challenge. I have lifted this from her mail to the group.... it started Monday the 9th in real time.... I did it for the following 5 days....

Leilani's Follow Me Blind art quilt challenge:work on one quilt for 5 days straight.
New instructions given each day you must follow through, no matter how painful! ;)Day One -- create a 9" x 7" fabric for the top of your quilt. this must be an altered piece of fabric, i.e. surface designed. you can paint on it, stain it, dye it, rubber stamp on it, color it, applique on it... but you must do something to itThis fabric is from last year (I think!), it's painted with acrylic paint then for the challenge I stenciled and stamped with inks..... will see what 'tomorrow' holds

Saturday, 7 November 2009

H1N1 ?


I saw this berry on a bush. It so reminded me of the pictuers on a poster for the H1N1 Virus. Now I realise that it is just a nice medical type picture and the virus looks quite different....

Free Blog Counter